[Susy2] Susy2 でプロジェクトを作成する
おさらいしつつ、サンプルプロジェクトを作成してみる。
[markdown]
## プロジェクトの作成
インストールは完了しているものとします。
> * [Compass: Susy2 をインストールする | deadwood](https://www.d-wood.com/blog/2014/07/23_6431.html)
プロジェクトを作成します。
途中から適用する場合は、`compass install susy` でOK。
“`prettyprinted
% compass create –using susy sample_susy2
“`
下記のようなファイルが生成されました。
“`prettyprinted
.
├── config.rb
├── sass
│ ├── _grids.scss
│ └── style.scss
└── stylesheets
└── style.css
“`
### [補足] config.rb
先日見た際には `require ‘susy’` の記述があったが無くなった?
確かになくても動きました。
> * [Getting Started — Susy 2.1.2 documentation](http://susydocs.oddbird.net/en/latest/install/)
### [補足] grunt の設定
現在、`compass watch` がうまく動かないので、grunt で監視できるよう設定しておきます。
> * [Compass: Susy2 をインストールする | deadwood](https://www.d-wood.com/blog/2014/07/23_6431.html)
> * [Sass + Compass + Susy2 watch & compile error with grunt | deadwood](https://www.d-wood.com/blog/2014/07/22_6504.html)
package.json を作成します。
“`json:package.json
{
“name”: “my-project-name”,
“version”: “0.1.0”,
“devDependencies”: {
}
}
“`
grunt をインストールします。
“`prettyprinted
% npm install grunt grunt-contrib –save-dev
“`
Gruntfile.coffee を作成します。
> * [Grunt: Compass のコンパイルと監視を行う | deadwood](https://www.d-wood.com/blog/2013/11/13_5027.html)
“`ruby:Gruntfile.coffee
‘use strict’
module.exports = (grunt) ->
grunt.loadNpmTasks(‘grunt-contrib’);
grunt.initConfig
compass:
dev:
options:
config: ‘config.rb’
environment: ‘development’
force: true
prod:
options:
config: ‘config.rb’
environment: ‘production’
force: true
watch:
files: [‘sass/*.scss’]
tasks: [‘compass:dev’]
grunt.registerTask ‘default’, [‘compass:prod’]
“`
* `grunt watch` で sass/*.scss を監視し、変更があればコンパイル。
* `grunt` で production 指定でコンパイル。
> * [Compassコンパイル時の引数|sass|study|kanapple.net](http://kanapple.net/study/archives/16)
## サンプルファイルを用意する
公式ドキュメントと下記のチュートリアルを動かしてみると、何となく利用方法がつかめるのですが、もう少しシンプルな内容を用意してみます。
> * [Susy 2.1.2 — Susy 2.1.2 documentation](http://susydocs.oddbird.net/en/latest/)
> * [A Complete Tutorial to Susy 2 — Zell Liew](http://www.zell-weekeat.com/susy2-tutorial/)
### index.html
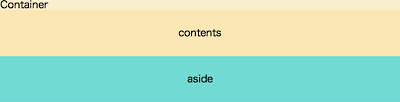
レイアウトしたい要素を用意します。
contents と aside を container で囲みます。
“`html:index.html
Container
contents
aside
“`
### style.scss
見やすくするため、チュートリアルの設定を元に div box の背景とタグの装飾だけ設定しておきます。
“`css:style.scss
// Screen
// ======
@import “grids”;
.container {
background-color: #fbeecb;
}
.contents {
background-color: #fae7b3;
}
.aside {
background-color: #71dad2;
}
h2 {
text-align: center;
font-size: 1rem;
font-weight: normal;
padding-top: 1.8rem;
padding-bottom: 1.8rem;
}
“`
### _grid.scss
こちらを変更しながら確認していきます。
css reset を設定しておきます。
“`css:_grid.scss
// Requirements
// ============
@import “compass”;
@import “compass/reset”;
@import “susy”;
$susy: (
global-box-sizing: border-box,
use-custom: (rem: true)
);
@include border-box-sizing;
.container {
}
.contents {
}
.aside {
}
“`
チュートリアルをみるといきなり上記の設定があってビックリしますが、とりあえずそのまま使います。
## $susy に設定を書く
準備ができたので susy を利用してみます。
susy では、`$susy` という hash に設定を書く決まりになっています。
謎の記述について確認しておきます。
### @include border-box-sizing;
susy の [global-box-sizing](http://susydocs.oddbird.net/en/latest/toolkit/#global-box-sizing) という mixin のそのまたショートカットのようです。
こんな CSS が出力されました。
“`css
*, *:before, *:after {
-moz-box-sizing: border-box;
-webkit-box-sizing: border-box;
box-sizing: border-box;
}
“`
### global-box-sizing: border-box
[global-box-sizing: border-box](http://susydocs.oddbird.net/en/latest/settings/#global-box-sizing) は、前述の border-box-sizing の設定値になります。
### use-custom: (rem: true)
[rem](http://susydocs.oddbird.net/en/latest/settings/#custom-rem) module の設定値のよう。default で true のようなので記述の必要ありませんね。
## レイアウトする
`@include container` でコンテナを指定します。
clearfix は Compass の mixin です。
“`css:_grid.scss
.container {
@include container;
@include clearfix;
}
“`
`@include span` で左右にレイアウトします。
12 カラムに分割し、9/12 を contents、3/12 を aside の表示に指定しています。
`last` オプションを付けると、その要素を最後の要素として扱ってくれます。
この場合は、3/12 の aside 要素が左に寄せになります。
“`css:_grid.scss
.contents {
@include span(9 of 12 last);
}
.aside {
@include span(3 of 12);
}
“`

基本的には、`@include container` と `@include span` だけでレイアウトをしてくれるようです。
この他にも細かな制御など色々と機能があるようなので、[また調べてみます](/blog/2014/07/25_6531.html)。
[/markdown]