[Server & Network General] tmux をインストールして使い始めるまで (Homebrew 編)
なかなか踏み出せずにいたのですが、こちらのエントリに背中を押され、はじめてみることにしました。
[markdown]
> * [tmuxを使い始めたので基本的な機能の使い方とかを整理してみた – 完熟トマト](http://kanjuku-tomato.blogspot.jp/2014/02/tmux.html)
## インストール
とりあえず手元の Mac にいれて、なれるところから始めることにしました。
“`prettyprinted
% brew install tmux
==> Installing tmux dependency: libevent
==> Downloading https://github.com/downloads/libevent/libevent/libevent-2.0.21-s
######################################################################## 100.0%
==> ./configure –disable-debug-mode –prefix=/usr/local/Cellar/libevent/2.0.21
==> make
==> make install
/usr/local/Cellar/libevent/2.0.21: 48 files, 1.8M, built in 60 seconds
==> Installing tmux
==> Downloading http://downloads.sourceforge.net/project/tmux/tmux/tmux-1.8/tmux
######################################################################## 100.0%
==> Patching
patching file osdep-darwin.c
patching file utf8.c
==> ./configure –prefix=/usr/local/Cellar/tmux/1.8 –sysconfdir=/usr/local/etc
==> make install
==> Caveats
Example configurations have been installed to:
/usr/local/Cellar/tmux/1.8/share/tmux/examples
Bash completion has been installed to:
/usr/local/etc/bash_completion.d
==> Summary
/usr/local/Cellar/tmux/1.8: 14 files, 668K, built in 32 seconds
“`
`/usr/local/Cellar/tmux/1.8/share/tmux/examples` に設定サンプルがあるよと言うことなので確認する。
設定ファイル `~/.tmux.conf` を作成する。
## Prefix の変更と Config Reload
キーバインドに `Ctrl-b` が使われていたり、ウィンドウの操作が独特な感じのため、どうやらこれを設定している方が多いよう。
少し試したところ、覚えられそうにないので、先人の設定ファイルを元に検討してみる。
まず Prefix のキーバインドを変更する。
“`bash:~/.tmux.conf
# Prefix key
unbind C-b
set -g prefix C-t
bind C-t send-prefix
# reload config
bind C-r source-file ~/.tmux.conf \; display “~/.tmux.conf is reloaded!”
“`
さらに設定ファイルの再読み込みのキーバインドを設定しておくと後が楽になりそうなのでやっておく。
> * [reload ~/.tmux.conf – Super User](http://superuser.com/questions/439441/reload-tmux-conf)
tmux 上で、下記を実行すれば設定ファイルを読み込み直せる。
“`prettyprinted
% tmux source-file ~/.tmux.conf
“`
以後は、上記のキーバインドが有効となる。
> * [unix – tmux set -g mouse-mode on doesnt work – Stack Overflow](http://stackoverflow.com/questions/11832199/tmux-set-g-mouse-mode-on-doesnt-work)
## esc キーの遅延をなくす
default では、esc キーの押下にディレイがあるそうなので、これを短くしておきます。
“`bash:~/.tmux.conf
# escape key delay
set -sg escape-time 1
“`
## Pane の操作を emacs 風に変更する
`ctrl+”` や `ctrl+%` に混乱したので、こちらを参考に変更する。
> * [第292回 .tmux.confの設定をしてみよう:Ubuntu Weekly Recipe|gihyo.jp … 技術評論社](http://gihyo.jp/admin/serial/01/ubuntu-recipe/0292?page=2)
“`prettyprinted
# Pane
# http://gihyo.jp/admin/serial/01/ubuntu-recipe/0292?page=2
# エスケープシーケンス+1で元に戻す
unbind 1
bind 1 break-pane \; display-panes
# エスケープシーケンス+2で横線による分割
unbind 2
bind 2 split-window -v \; display-panes
# エスケープシーケンス+3で縦線による分割
unbind 3
bind 3 split-window -h \; display-panes
# エスケープシーケンス+oでペイン間を移動
bind -r C-o select-pane -t :.+ \; refresh-client
bind -r o display-panes \; select-pane -t :.+ \; refresh-client
# 「C-k」でペイン単位に削除する
unbind C-k
bind C-k confirm kill-pane
unbind K
bind K confirm kill-pane
“`
## trackpad(mouse) スクロールを有効にする
例えば、cat で流れたテキストをさかのぼりたいと思ってもできない。
バッファをスクロールするには、以下を設定する。
“`bash:~/.tmux.conf
set -g mode-mouse on
“`
> * [tmuxでマウス(trackpad)でバッファをスクロールする – ( ꒪⌓꒪) ゆるよろ日記](http://yuroyoro.hatenablog.com/entry/2013/09/30/172331)
### terminal.app
が、terminal.app ではうまく動かない。
[MouseTerm](https://bitheap.org/mouseterm/) という SIMBL プラグインをインストールする必要があるそう。
> * [tmux でもマウスホイールでスクロールバックしたい – 刺身☆ブーメランのはてなダイアリー](http://d.hatena.ne.jp/a666666/20110425/1303747389)
> * [【OS X】tmux, lessでマウススクロール | チラシの裏](http://blog.0x2ek.net/?p=449)
#### SIMBL をアンインストールする
SIMBL って聞き覚えがあるなと思ったら、SafariStand もそうでした。
いまは EasySIMBLで管理するのが良いようなので、乗り換えます。
> * [SafariStand – hetima.com](http://hetima.com/safari/stand.html)
> * [chibiegg日誌](http://blog.chibiegg.net/2007/11/18_16_66.htm)
* [SIMBL](http://culater.net/software/SIMBL/SIMBL.php) のインストーラに含まれている `SIMBL Uninstaller.app` でアンインストール。
* 以下のディレクトリを削除。
“`prettyprinted
% sudo rm -rf /Library/Application\ Support/SIMBL
% sudo rm -rf /Library/InputManagers/SIMBL
% rm -rf Library/Application\ Support/SIMBL
“`
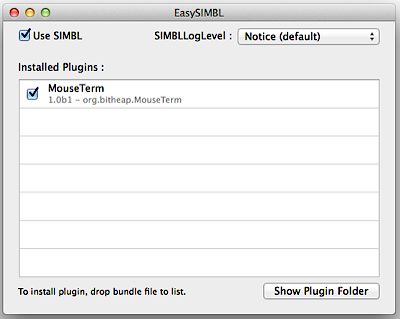
#### EasySIMBL と MouseTerm をインストールする
> * [norio-nomura/EasySIMBL](https://github.com/norio-nomura/EasySIMBL#easysimbl)
> * [brodie/mouseterm](https://github.com/brodie/mouseterm)
* アプリをダウンロード、/Applications へ。
> * [EasySIMBL 1.6 – アプリの機能を拡張するプラグインの母艦ソフト](http://www.macsoft.jp/posts/view/3800/)
> * [【OS X】tmux, lessでマウススクロール | チラシの裏](http://blog.0x2ek.net/?p=449)
* [MouseTerm](https://bitheap.org/mouseterm/) をダウンロード。
* EasySIMBL.app を起動し、MouseTerm.bundle をウィンドウにドラッグ&ドロップ。
* `Use SIMBL` をチェックして、アプリを終了。
* Tearminal.app を再起動する。
### iTerm.app
iTerm.app ではうまく動く。
が、Copy & Paste ができない。
こちらの `option` を押しながら選択することで、動きました。
> * [tmux+iTerm2でマウス(タッチパッド)利用時にマウスによるコピペができない問題の対処 – Qiita](http://qiita.com/u1tnk/items/9a680d16065217015e16)
iTerm は、オプションも多いし、色々ありそうですね。
## trackpad(mouse) ペイン操作を有効にする
スクロール以外にも、ペインの操作をしたくなりそうなので設定しておきます。
“`bash:~/.tmux.conf
set -g mode-mouse on
set -g mouse-select-pane on
set -g mouse-resize-pane on
set -g mouse-select-window on
“`
直感的な動作ができました。
リサイズだけ正しい挙動がどんなものか分かりません。
### terminal.app
が、Copy & Paste ができない。
こちらも `option` を押しながら選択することで、動きました。
## trackpad(mouse) 操作の on/off を設定する
上記の設定を行うと、vim 内のスクロールのつもりが、tmux の操作になっています。
どうやら、状況に応じて mode-mouse を on/off するようなので、こちらの設定を拝借します。
> * [tmuxでマウスモードのON/OFFを単一キーで簡単に切り替える – Qiita](http://qiita.com/kawaz/items/7b15e18ca8e072c1dc57)
“`bash:~/.tmux.conf
set -gw mode-mouse off
bind-key m \
if-shell “tmux show-options -gw mode-mouse | grep off” “set-option -gq mouse-utf8 on” “set-option -gq mouse-utf8 off” \;\
if-shell “tmux show-options -gw mode-mouse | grep off” “set-option -gq mouse-resize-pane on” “set-option -gq mouse-resize-pane off” \;\
if-shell “tmux show-options -gw mode-mouse | grep off” “set-option -gq mouse-select-pane on” “set-option -gq mouse-select-pane off” \;\
if-shell “tmux show-options -gw mode-mouse | grep off” “set-option -gq mouse-select-window on” “set-option -gq mouse-select-window off” \;\
if-shell “tmux show-options -gw mode-mouse | grep off” “set-option -gw mode-mouse on” “set-option -gw mode-mouse off”
“`
## status-line(bar) の表示を変更する
上記の mode-mouse の on/off 状態をひと目で把握したかったのですが、設定方法がよく分からなかったので試行錯誤しました。
> * [My Tmux Configuration – Zanshin.net](http://zanshin.net/2013/09/05/my-tmux-configuration/)
これで右側に表示されました。
“`bash:~/.tmux.conf
set -g status on
set -g status-right “#(tmux show-options -gw mode-mouse|sed ‘s/mode-//;s/ /:/’)”
“`
ただ標準の設定が消えてしまったので、追加する方法を探します。
一度設定を外して再起動。以下のコマンドで確認する。
“`prettyprinted
% tmux show-options -g | less
:
status-right “”#22T” %H:%M %d-%b-%y”
:
“`
最初はホスト。
おそらくこの設定を上書きしているので、これも設定ファイルに追加します。
“`bash:~/.tmux.conf
# status line
set -g status on
set -g status-interval 5
# show mode-mouse on/off on right side of status bar
set -g status-right “#(tmux show-options -gw mode-mouse|sed ‘s/mode-//;s/ /:/’) :: #H :: %H:%M %d-%b-%y”
“`
区切り文字も付けて完成。

> * [My Tmux Configuration – Zanshin.net](http://zanshin.net/2013/09/05/my-tmux-configuration/)
> * [第292回 .tmux.confの設定をしてみよう:Ubuntu Weekly Recipe|gihyo.jp … 技術評論社](http://gihyo.jp/admin/serial/01/ubuntu-recipe/0292?page=3)
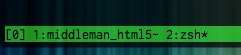
## カレントウィンドウに名前を付ける
少し使ってみて判別つきやすいように名前を付けたくなった。
`prefix+,` でリネームできる。
## 補遺
略記が可能。
“`prettyprinted
set-option => set
set-window-option => setw
“`
> * [tmuxの外観をカスタムして、運用と開発を加速させる – Glide Note – グライドノート](http://blog.glidenote.com/blog/2011/12/16/custom-tmux-visual/)
> * [glidenote/learning-tmux](https://github.com/glidenote/learning-tmux)
設定詳細コメント付き。
> * [外道父が清書した .tmux.conf | 外道父の匠](http://blog.father.gedow.net/2013/07/18/tmux-conf/)
[/markdown]